As a singer and choir leader, a lot of my job involves writing vocal arrangements for different groups. Lucky for me, it is one of my favourite things to do.
Here’s how I go about it, with notation (Sibelius) and recording (Logic) software.
1. Listen & Know
First, I listen to the song I want to arrange. As many times as I can in the space of a few days. I’ll have a few numbers in my songs to arrange playlist at any given time, and I’ll try not to allow myself to get bored. I’ll pay attention to any harmonies, other vocal parts and interesting instrumentation, as well as the overall shape and feel of the piece.
I always know who I’m arranging for, and this informs my next step. An arrangement for a school choir with two parts is wildly different from a 7 part a cappella arrangement, and I need to take the voices into consideration here. I will take you through my school choir process here, as a cappella arranging is worthy of it’s own article. I usually work with a piano accompaniment, unless I know there’ll be a band from the outset. My most common voice set up, as asked for by the massed primary school choir project I lead, is to put one voice (Part A) on the melody throughout and any harmony or response lines on a second voice (Part B). This allows other choir leaders to decide if they or their singers are capable of singing anything other than the tune. I ensure there is a lot of unison, especially in verses, to make it more fun to sing.
I work primarily in Sibelius when writing and arranging music, as it’s the software I know best – I currently only use their Artist tier, although this has sometimes been difficult writing for a 14 piece band, as it only allows 16 staves – not even just instruments, staves, so the piano takes up 2!
2. Melody & Key
I will write out the melody on one part and fill in the piano accompaniment underneath, section by section. I will usually use a range of sources to help with the accompaniment, such as other scores, guitar tabs or I’ll transcribe what I hear. When I’ve written out the melody, I will make a decision on the key – pop songs sung by men tend to be too low in the original key, whereas pop songs by power house female singers might be a little too high. For younger children, I try and keep the vocal range to A3 – D5, with occasional notes outside. This ensures you don’t lose the low end notes and the higher notes will be (largely!) in tune. A good rule of thumb for this is shifting male lead songs up a major third or a perfect fourth, and adjusting where necessary. You might have to revise some melody lines if they are slightly too low – I’d rather this way round than adjusting high notes, as these tend to be in more memorable phrases.
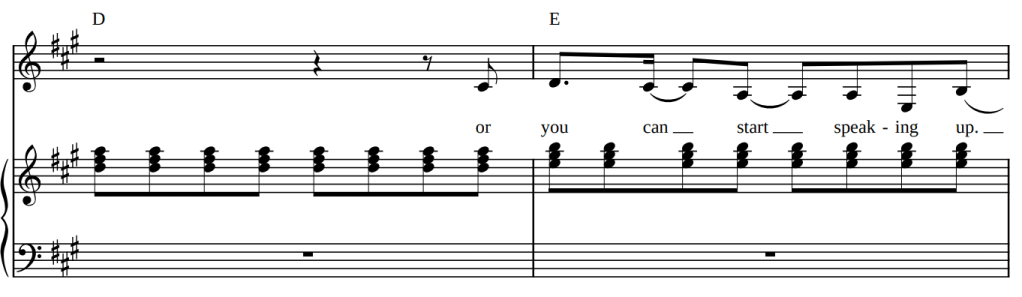
Here is the original melody of Brave by Sara Bareilles. The F# is way too low for children’s voices.

Here is my reworked melody – in this version the lowest note they sang was an A.
3. Harmony
For the other parts, I tend to use a mix of harmonies and response lines – these I usually take from existing backing vocals.

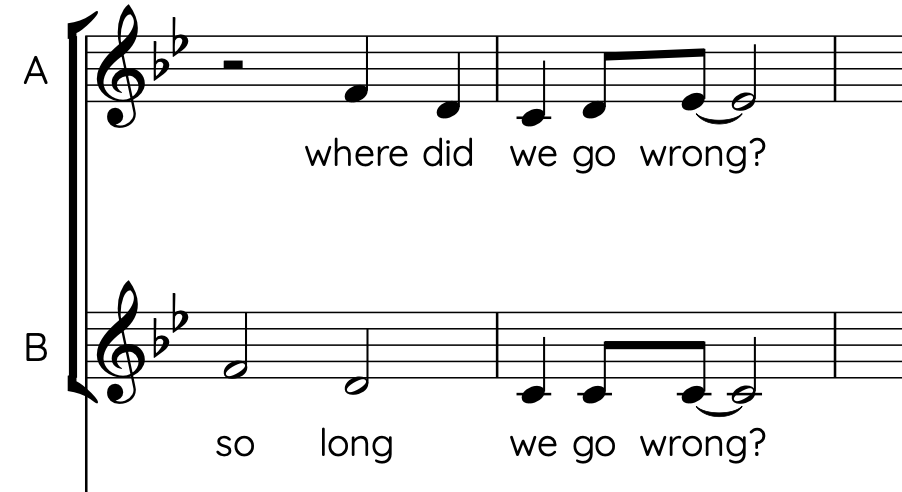
Above is the chorus of my arrangement of Mr Blue Sky for 2 part choir. You can see I’ve used the original call and response vocal lines to create new parts and added some simple harmonies.
Harmony lines should be easily accessed – for example, starting on the same note as the melody and staying on it. Always try singing your harmony line as you write it – if you can’t sing it with one or two practices, school choirs will struggle with it. Avoid jumps of more than a fourth and try to make it as melodic and memorable as possible. Close harmony should be resolved quickly and to notes within the accompaniment. Most of my harmonies will be based on the thirds that build up the harmonic structure of the song.
Use harmonies sparingly. Not every line needs a vocal harmony, especially verses. I tend to add a harmony or two in a second verse, but I’ll keep the first verse in unison. This is particularly true of wordy verses. Pick your battles – either ‘complex’ with a harmony, or ‘complex’ with the words and rhythms.
For a school choir, especially a younger choir, I will keep choruses exactly the same each time, aside from dynamic differences. This makes it easier to learn and easier for your leader to teach. Older choirs will be able to learn variations of sections, but make the change obvious and early in the section. Be wary of ad lib sections – I tend to avoid copying these into arrangements unless I know my choir will cope with them, as the rhythms and riffs are difficult to master as a group.
4. Record & Check
The last part of my arranging process is to record the parts. Here, I really can tell if my lines are singable, memorable and if they work well together. These recordings are also useful as guide tracks for other leaders to teach with and choirs to practice alongside. I always recommend that leaders use a recording of the other part to check for learning – ie the Sopranos sing against the recording of the alto part. Once I’m happy, I will go in and tidy up the score, making it readable, fixing any rest or lyric errors and making it fit on as few pages as possible – better for the environment!
If I have more instruments I will also add them into the recording process and double check that their parts fits my vocal lines and vice versa. Logic Pro X has some good ‘session’ musician options to help create drum grooves and bass lines if this isn’t your thing.
The best way of checking through an arrangement is to ask others to sing it. Perhaps not your children’s choir, but if you can teach your arrangement to another singer, you know you’re on the right track.
I hope this helps you start your arranging journey! Let me know what else in the arranging process you want to know about.

Leave a comment